Showing posts with label Parmesan. Show all posts

Thursday, April 17, 2014

Incredible Onion Pie

Have you ever had a fresh, home grown sweet onion that was so sweet and fresh it could have doubled for an apple?  Well last fall I had stopped by a friends house in the valley and as I was leaving, she handed me this huge onion.  I used it in dinner for the next three nights and was sad to see the end of it.  I'd never had an onion so big and so sweet.  

Two things came from this lovely gesture.  One, I've dreamed about making a sweet onion pie since last fall, and two, I just ordered plants of this heirloom onion called Ailsa Craig.  I actually love that name too.  Hum... Ailsa Craig is an island of 219.69 acres in the outer Firth of Clyde, 10 miles from the Scottish mainland, upon-which blue hone granite was quarried to make curling stones. The island is formed from the volcanic plug of an extinct volcano.  Gosh, I had no idea.  What a great name for an onion the size of a small island!

The Ailsa Craigs are gone until the end of summer, but this same friend brought me a few of their storage onions (huge as well) and so I decided to go ahead and make that onion pie today.  

Incredible Onion Pie

3 cups of diced sweet onion
(You may have a little more or less onion and optionally add up to 1 additional cup of other veggies (4 cups total) - I used a sweet red pepper or you could use asparagus, spinach, etc. or nothing at all, just more onion)  Sweet onions will make the sweetest pie, but any good firm onion will make this dish delicious.
1/4 cup olive oil

Dry ingredients:
1 cup flour
1 1/2 tsp baking powder
1 tsp salt
1 tsp sugar
1/2 tsp dried basil

Wet ingredients:
1 cup milk
3 large eggs
1 tablespoon Franks hot sauce or Worchestershire (optional)

Heat oven to 400 degrees and lightly spray or grease your baking dish(es).

This pie is similar to the "Impossible" versions made with a commercial baking mix like Bisquick.  I designed this version to be made from ingredients that most people have on hand, no need to have a special baking product.  The ingredients will form a crust of sorts that will hold the pie together.


Cook the diced onion in a skillet until softened and slightly caramelized and allow to cool.


Place the dry ingredients in a container that is large enough to hold all of the ingredients.  In a separate container, place and blend the wet ingredients together.  When the onion mixture has cooled slightly, mix the wet ingredients into the dry ingredients.  After stirring thoroughly, add the onion mixture and mix together.


Pour the finished mixture into the individual serving dishes or into a greased  9 or10 inch, deep dish pie plate and top with shredded Parmesan cheese.

Place either the individual dishes or pie plate on a pan and place into the 400 degree oven.

Bake for 30-40 minutes until a knife inserted approximately 1 inch from the center comes out clean and the top is a golden brown.


Serve individual dishes or large wedges of the pie along with a green vegetable for an easy and beautiful meal.

Enjoy!


Thursday, December 26, 2013

Casserole 101

Casserole 101
Sometimes I think the casserole has gone the way of Plum Pudding -- not too many people are cooking them anymore.  A lot of people think "casserole - 1970's - Betty Crocker" but, that's crazy because casseroles are usually easy to put together, flexible, and you can do them ahead so you aren't scrambling around in the kitchen at the last minute.  

The definition of a casserole is "flexibility".  It is a one pan meal cooked in the oven, usually with a brown and crusty top, and may consist of (part 1) rice/grain, potatoes, or noodles, combined with (part 2) vegetables, (part 3) meat or beans, and (part 4) some type of sauce.  Measurements in a casserole may be approximations. For example, you've got 2 cups of cooked rice or 2 1/2 cups, throw it in, as long as the ingredients are somewhat proportional there is no exact science.  I'm going to give you a "flexible" recipe to experiment with.  Let me know how it goes for you and what you did to make it your own.  By the way, if you aren't feeling inventive, it's ok if you just follow what I did because it was delicious!

Casserole 101

Part 1:

For my casserole I used rice.  I was in a bit of a hurry so I used jasmine rice, but I could have used quinoa, or brown rice, or any cooked grain.
I cooked 1 cup of rice in 1 3/4 cup of water and put that as the base in my oil sprayed dish.

Part 2:
We love brussel sprouts and I had picked up a large bag from the co-op for the holidays.  I cleaned and boiled them until they were still bright green, but almost done.  I could have used lightly steamed broccoli, or chopped and sauteed kale, and I could have added sauteed onion to any of these.

Part 3:
OPTIONAL for vegetarians or those who don't want meat, use your favorite protein - be it beans or tofu and it's perfectly ok to skip the meat layer in any casserole.  I had a little left over ham so I diced that up for my meat layer.  It ended up being about a cup of diced ham.  This could have been chicken, beans, ground beef, prosciutto, or none of these.

Part 4:
The sauce.  I chose to make a simple white sauce.  Place 4 tablespoons of butter and 3 tablespoons of flour in a skillet stirring constantly over low heat to make a roux.  
Making the roux.

For a white sauce, you do not want to brown the roux. When it's bubbly as shown in the picture, add 2 cups of milk all at once while stirring until it comes back to a boil and has thickened to a nice consistency.
 Add salt and pepper to taste 1/2-1 teaspoon of salt and a dozen grinds of fresh black pepper.  Herbs make a nice addition to the sauce as well.


Putting it all together.


After you have layered up part 1-2-3, pour your sauce evenly over the dish.


Regarding the sauce, once you have created that, you could add grated Cheddar, Parmesan, or Asiago to the sauce and allow that to melt before pouring.  This would combine well with a pasta layer to make a layered mac and cheese type casserole.


I wanted a lighter flavor for this version, so added a sprinkling of Asiago cheese mixed with a tablespoon of bread crumbs to the top of the casserole for a crusty-cheesy-browned top. 

Everything in the casserole is cooked so the baking time is just to heat it through and bring everything together.  Bake the casserole in a 375 degree oven for 30 - 45 minutes or until the top is browned and bubbly.  If you've made it ahead and had it refrigerated, it might take a little longer to heat through. Allow 60 minutes. Let the casserole cool slightly before serving big squares.


It came out just as tasty as it looks.  Served with a little spinach side salad, it made an impressive and delicious dinner.

I turned leftover ham and brussel sprouts into an entirely new dinner dish.  I could have reheated them and thrown them on a plate with the rice, but this was so much more appetizing and it made that little bit of ham stretch into 4 meals and no one felt slighted.

Here's a couple of ideas for different versions you might want to try for Casserole 101:

Mexican - rice - well drained, diced tomatoes - taco seasoned ground beef and/or black beans - top with a sauce to which has been added a cup of grated cheddar or a Mexican cheese mix - finally top with tortilla chip crumbs.

Broccoli/Cheddar - pasta of your choice, spirals or elbows work well - top with a layer of beans (can be white, red, or black) - lightly steamed broccoli - cheddar cheese sauce, made by adding a cup of grated cheddar cheese to the white sauce - top with bread crumbs.

Quinoa/Kale - quinoa - saute 1 bunch of kale, 1 sweet onion, 2-3 cups chopped green cabbage - optional meat layer of ham or Italian sausage - simple white sauce with 1 tsp dried basil added when it is finished - top with 1/2 cup Parmesan cheese mixed with 1/2 teaspoon Italian herbs and 2 tablespoons of fresh bread crumbs.

Please feel free to share your 4 part combinations to inspire everyone.
Enjoy!


Sunday, October 27, 2013

Sweet Potato Gratin

Sweet Potato Gratin
An idea has been bouncing around in my head for a few weeks and finally I've got it out and prepared. The idea originated with the sweet potato.  I like sweet potatoes and I was giving some thought to something new for the coming Thanksgiving holiday.  I am not a big fan of the yam and even less of a fan of the yam turned candy with marshmallows.  

I wanted something that would be a little more savory but still accent the sweetness of the sweet potato.  I also liked the idea of something I could prep ahead.  Did you know that sweet potatoes and yams are not even remotely related to each other and neither of them is related to the potato. Sweet potatoes are from the same family as morning glories. I like that.

Here's a little sweet potato gratin that I cooked up.  Gratin is just a fancy word for a dish that has a browned crust on top. You can switch the sweet potatoes for yams if that is your preference, but do me a favor try it with sweet potatoes first.

Sweet Potato & Caramelized Onion Gratin
Ingredients:
3-5 medium sweet potatoes (2-3 lbs)
1 cup grated Parmesan cheese
 
2 tablespoons olive oil
3-4 cups chopped onions
3 tablespoons dark brown sugar
pinch to 1/4 teaspoon cayenne pepper

1/4 cup butter
Peel and thinly slice the sweet potatoes

2 1/2 tablespoons flour

2 cups of half and half, light cream, or whole milk
1 1/2 teaspoon salt
1/4 teaspoon dry ground mustard
1/4 teaspoon sweet paprika
1/4 teaspoon nutmeg
 Preheat the oven to 350 degrees and butter or spray an oblong baking dish, 9x13 or similar.

Peel and slice the sweet potatoes very thinly and set aside.  1/8th inch thick is a good thickness. 
Caramelize the onions and add the brown sugar and cayenne

Chop the onion and add them to a skillet with the olive oil.  Begin to sweat the onions slowly.  Once they have lost most of their water, they will begin to caramelize into a nice golden color.  After the onions have caramelized to a light brown, add the dark brown sugar and the cayenne pepper.  Remove from the heat and set aside.


Create the sauce


In another skillet, create a roux with the 1/4 cup butter and the flour.  Add the 2 cups of cream/milk all at once stirring until it is smooth and bubbly.  Turn off the heat and stir in the salt, mustard, paprika, nutmeg, and a few grinds of black pepper.

In your buttered dish, layer half of the sliced potatoes, half the sauce, 1/2 cup of the grated Parmesan and half the onions with their sweet sauce.  Create a second layer with the remaining ingredients, ending with the onions once again.


Cover the dish tightly with aluminum foil.  You can refrigerate it at this point until the next day or until you are ready to bake it.  Bake in a 350 degree oven, covered with the foil for 45 minutes.  At 45 minutes, remove the foil and continue baking for another 15-20 minutes until it is browned and bubbly.


This little dish pairs nicely with turkey, but also with a pork roast or chicken. 

Enjoy!
 

Monday, September 17, 2012

The Glory of the Harvest


 It’s the time of year when we count every night that passes without a frost as a bonus.  Here on the side of the mountain northwest of Missoula, we live in a special little micro-climate that affords us many weeks longer growing season than our neighbors in the valley.  I’m grateful for every growing day I get.

I have a bumper crop of tomatoes that are ripening on the vine.  Soon I’ll be canning marinara, harvest soup, and eating them for breakfast - lunch - and dinner, knowing it will be a long dry spell for fresh tomatoes.  The onions and garlic are already harvested and drying, the potatoes and carrots will be next.

Beautiful Millionaire and Prosperosa Eggplant

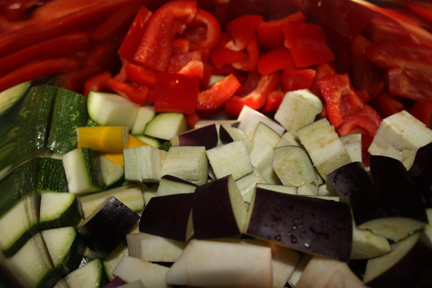
Today I harvested a few eggplant, zucchini, tomatoes and some peppers to make my ratatouille.  Ratatouille is just another word for a vegetable stew.  Mine is simple and only takes a few minutes to prepare a big pot to enjoy for at least a couple of meals.  This stuff is so delicious that I also can it in quarts for use all winter.
   
Ratatouille
2-4 Tablespoons olive oil
1-2 Medium sweet onion
1-2 Medium eggplant
1-2 Medium red or green bell peppers

Large diced veggies
3-4 Medium green or yellow zucchini
4-6 Cloves of garlic
A handful of fresh basil and oregano

2 teaspoons salt
1-2 Tablespoons sugar
3 14oz cans of diced tomatoes (canned tomatoes are ok to use as they come in the can without draining) or 4-5 cups of fresh garden tomatoes that have been peeled, seeds removed, and excess water drained off.  If using fresh tomatoes, just do them first and let them drain in a 

colander while preparing the rest.
Begin to saute the veggies

Wash and dry the vegetables.  When it comes to the vegetables, there is no exact measurement, this is just a stew.  I say 1-2 Medium, but in general each vegetable ingredient equals about 3 - 5 cups more or less, when chopped. 
 Put the olive oil in a large pot and start with the onions.  Chop the onions and begin to saute them over medium heat.  As soon as they start to soften, turn the burner off and begin to add all of the rest of the vegetables that are chopped into large 1 - 1 1/2 inch pieces.


Mince the fresh herbs and the garlic and add that to the pot as well.  Turn the heat back on to medium and stir and begin to cook the vegetables together.  Add the tomatoes and salt and bring to simmer.  Simmer for 60-90 minutes until the vegetables are cooked through.


Add the chopped and drained tomatoes
Yummmmm!
As the ratatouille is ready, taste it for the appropriate amount of salt and sweetness and adjust to your taste with more salt or sugar.


I serve this over rice or pasta with a sprinkling of Parmesan cheese as a hearty main dinner dish.   Enjoy!

Sunday, August 19, 2012

Cabbage Noodle Casserole

Every once in a while, we need to be inventive.  I had some freshly made pesto in my food processor, a cabbage and some sweet onions from the garden on the counter, and the need to make a dish to take to a friend.

That's how this all started and here is what I did.  I invented a Cabbage Noodle Casserole.  This dish makes a great vegetarian main dish or a nice side dish.


CABBAGE NOODLE CASSEROLE
(makes 1 large 8 serving or two 4 serving casseroles)

1  head of green cabbage, chopped
1 large sweet onion, chopped
3 Tablespoons olive oil

In a large skillet, add these first three ingredients and begin to caramelize the onions and cabbage.

As the cabbage and onions turn a nice caramel color, turn off the heat.

In a separate pan, cook just until aldente 4 cups of wide noodles.
Drain the noodles and toss the noodles and cabbage mixtures together.

Add to the mixture 1/2 cup of pesto and 1/2 cup shredded Parmesan cheese.

Toss this all together to mix and place in one large or two smaller casserole dishes.

Top with a hand full of Parmesan cheese and place under the broiler to brown the top.  Instead of the cheese on top, some nice Italian bread crumbs or croutons would work as well.

This is totally cooked and ready to eat as soon as the cheese is melted and the top is browned.


. 

Got Basil - Got Garlic

Let’s make pesto!  

I've had no less than 3 inquiries about my pesto recipe in the last week, so it sounds like it's time. My basil and garlic are ready to go, so rather than wait another minute, here is my “not so secret” recipe.

Basil and garlic are among those Mediterranean medicinal herbs that are supposed to do great things for your health... and since they are so delicious, why not have them year round!

Traditionally, pesto is made with a mortar and pestle - thus the name pesto.  It is said to have origins in northern Africa, been domesticated in India, and perfected in Genoa, Italy.  Leave it to me to have to come up with my own recipe for the stuff, but I had some modern criteria I wanted my pesto to meet.


I wanted something that I could store and it would stay fresh throughout the long Montana winter.  I did not want to use pine nuts as I have had too many with an off/fishy taste.  A lot of the pestos I had tried were swimming in olive oil, thin and runny.  I thought mine should have less oil and more basil.  Also, with a food processor in my pantry, I was not about to use the mortar and pestle method.

This recipe is simple and only takes a few minutes to make, and you can enjoy it until the basil grows again next year.  (PS - plant more basil next year.)

PESTO
(makes about 4 - 5 cups)

4 cups packed (pack as many leaves as you can into a 4 cup measure), fresh picked, cleaned, and dry basil leaves 
(I use both the Genovese and the larger lettuce leaf varieties, The salad spinner makes quick work of the wash and spin, then I lay them out on a towel to dry, fluffing them a couple of times to assist in the drying process.)
6 large cloves of garlic, peeled
2 cups of walnuts
1 1/2 cups of shredded Parmesan or Romano cheese 
2 teaspoons of salt, or to taste
3/4 cup lemon juice
1 cup olive oil
       
I start with the garlic and the lemon juice in the food processor.  Once the garlic is finely minced, I add the 4 cups of basil leaves and mince those.
Add the salt, walnuts, and cheese and the mixture will be very heavy.
 
With the food processor running, I drizzle the olive oil into the tube and continue to let it work until the whole thing comes together into a beautiful, creamy, light green color.

I then taste to see if it meets my satisfaction.  You can add more salt, more lemon juice, or more oil to your taste and process again until it is well blended and creamy.


Then put the pesto into jars or freezer safe containers that will hold about ½ to 1 cup each.  I use half pints, the tapered jelly jars work fine too.   Put them right into the freezer.  The pesto will retain it’s beautiful, fresh, light green color while frozen.  

Before you plan to use it, move a jar to the refrigerator to thaw.  It will keep for weeks in the refrigerator.  Once opened it will gradually oxidize on the top.  This is normal and doesn't hurt anything.
 
Here are just a couple of suggestions for using your pesto, beyond the linguine that is...

How about spreading it on a loaf of french bread, top with a little mozzarella and broil, or toss it with some new potatoes or green beans, make a green pizza by spreading it on the dough instead of a red sauce - then top with chopped tomatoes and a little mozzarella for a different style Margarita pizza.  I have even known someone that spreads it on a turkey sandwich as a condiment.  Let me know if you discover any great new uses for it, and I will be sharing some additional pesto uses as time goes on.

(Just as I was finishing this post, my husband came in and told me our neighbor was recovering from a fall. I decided to make a casserole for him using the left over pesto and a cabbage I had sitting on the counter - see the next post.)