Showing posts with label basil. Show all posts

Friday, August 23, 2013

Garden Freestyle

Today's bounty
Wandering through the garden each morning with an eye toward what will be for dinner is one of the great pleasures in life.  Gardens often offer up bountiful surprises in some years and disappointment in others.  Zucchini seems to be one of those bountiful crops and so I ponder new ways to use this beautiful vegetable.

I love soup and it's something we sometimes don't think about as a summer meal, but this one will surprise you with it's light, savory, fresh from the garden flavor.

Garden Freestyle - Soup
 This recipe makes a good sized pot of soup and the variations are endless.

Start with:
Saute the onions in olive oil until translucent


3 quarts of chicken stock (you can use Better Than Bouillon Chicken or Veggie for the stock if you wish) 
2 cups onion chopped
2 tablespoons olive oil
4 cloves of garlic minced
8-10 slices of bacon cooked, drained, chopped
2 cups half and half or heavy cream


From the garden - co-op - farmer's market:
4 - 5 cups chopped zucchini (1" pieces) or cauliflower or cabbage or a combination
4 cups chopped kale or chard or spinach or a combination
1/2 - 1 cup of chopped fresh herbs - usually basil and thyme, sometimes a little oregano or sage. If you don't have fresh herbs, use about a teaspoon each of dried basil and thyme.
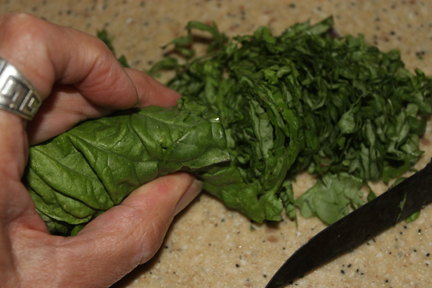
I wash, stack, and roll the kale and basil leaves and slice them.

If you have a few potatoes, a little corn or peas, let your intuition and garden dictate what you will make today.  I've tried a number of different combinations, but my favorite is still just the zucchini and kale which are always abundant.  The amounts are just guidelines.  If you chop up 5 zucchini and get 6 cups, use it, it's no problem with this Freestyle soup.


Step 1 - cook the bacon and set it aside to cool, drain, and chop
In the pot ready to simmer.

Step 2 - saute the onions in the olive oil until they become mostly translucent
Step 3 - add the garlic, chopped veggies, and the stock
Step 4 - add the bacon (additional meat is optional - in this photo you see a little chicken that I picked from the bones when I made my stock from a chicken carcass. 
Step 5 - add the herbs and simmer until the veggies are tender, about 15-20 minutes depending on the veggies you
are using.
Step 6 - stir in the half and half or heavy cream and season with salt and pepper to taste. 

Serve this Garden Freestyle soup for lunch or dinner with a crusty bread if desired. 

If you have left overs, they get even better the next day as the smoky flavor increases.  This is an amazingly delicious light summer soup, made with the freshest ingredients your garden or farmer's market can offer!

Enjoy!


Sunday, September 30, 2012

Fire Roasted Marinara Sauce

 Fire roasting gives a slight smoky flavor to whatever you roast and so I thought it might be just the perfect way to start my marinara.  This sauce is made from tomatoes, onions, garlic, herbs and a few peppers, freshly plucked from the garden.

Some people call it spaghetti sauce, or Italian tomato sauce, but marinara has a nice ring to my ear.  One theory suggests the sauce was invented by the Spanish in the mid 16th century.  Because of the high acid content of tomatoes, the sauce was resistant to spoilage, making it ideal for lengthy sea voyages and thus sprang the name marinara.  Whatever the name, fire roasting does add an additional element of flavor to the tomato.

Fire Roasting

Two more helpful reasons to fire roast are the removal of additional moisture, and if you want to remove the skins, they can be picked up in your fingers and tossed aside - no need to blanch and skin.

To get started, I took about 10 pounds of San Marzano tomatoes from the garden.  I washed them, cored them, sliced them in half lengthwise and removed the seeds.  I took a couple of onions and sliced them into ½ inch slices, and I cored and sliced lengthwise a couple of peppers.


Fire Roasted Tomatoes

Fire Roasted Marinara

10# fresh Italian paste tomatoes like San Marzano’s
2 large onions
4-6 cloves garlic minced
2-4 green peppers
2-3 Tablespoons fresh minced basil (1 TBS dried)
2 Tablespoons minced oregano (1 TBS dried)
1/2 cup olive oil - divided
3-4 teaspoons salt (or to taste)
1-2 Tbs sugar (optional or to taste)

Fire Roasted Peppers and Onions

Bring your grill to about 350 degrees with medium heat.  Put 1/2 the olive oil in a dish and brush the inside of the tomato with olive oil and place on the grill cut side down.  Quickly fill the grill with tomatoes and close the lid.  The temperature will have dropped to 200 degrees or below.  Wait until the temperature rises to 350 again.  Quickly open the grill and brush the top side of the tomatoes with olive oil and then check the first tomatoes that you put on.  They should have grill marks on them.  Using a spatula, quickly flip them over and close the lid again, waiting for the temperature to get back up over 350 degrees. 

Have a rimmed pan or bowl to put the roasted tomatoes into as juice will continue to run out after you take them off.  Remove the roasted tomatoes from the grill to the rimmed pan and let them cool.  Roast the other vegetables in the same way, brushing them with olive oil and leaving them on the grill to show a little black char marks, but not totally blackened.

Once the tomatoes are cool, you can use your hands to pluck the skins from the tomatoes if you wish, or you can just leave them on as they will be chopped up in the next step.


Add the chopped garlic and herbs to the sauce.

Drain off the liquid from the roasted tomatoes and reserve this liquid. Put the tomatoes into a food processor and pulse to chop finely.  Add the processed tomatoes to a large stock pot with the other 1/2 of the olive oil. Process all of the rest of the ingredients roasted and not and add them to the stock pot.

Thick sauce ready to be cooked


Simmer the sauce for 60-90 minutes stirring frequently. It will be thick and you will need to watch so that it does not burn.  Add the salt, pepper, sugar, and the juice that you reserved from the roasted tomatoes to suit your taste and thickness.


You should end up with about 6 pints (12 cups) of sauce.  You can place that into hot pint jars, seal them and put them in a boiling water bath for 35 minutes or you can cool the sauce and then put it into freezer bags in portions for future use.  Just like the pesto recipe that I gave you last month, there is no end to the uses you will have for this sauce, so make plenty!   

Monday, September 17, 2012

The Glory of the Harvest


 It’s the time of year when we count every night that passes without a frost as a bonus.  Here on the side of the mountain northwest of Missoula, we live in a special little micro-climate that affords us many weeks longer growing season than our neighbors in the valley.  I’m grateful for every growing day I get.

I have a bumper crop of tomatoes that are ripening on the vine.  Soon I’ll be canning marinara, harvest soup, and eating them for breakfast - lunch - and dinner, knowing it will be a long dry spell for fresh tomatoes.  The onions and garlic are already harvested and drying, the potatoes and carrots will be next.

Beautiful Millionaire and Prosperosa Eggplant

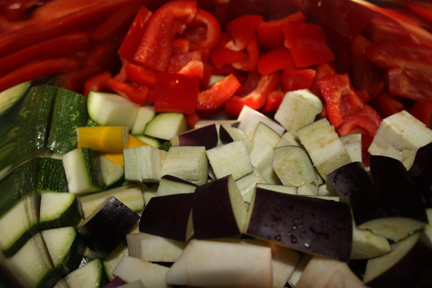
Today I harvested a few eggplant, zucchini, tomatoes and some peppers to make my ratatouille.  Ratatouille is just another word for a vegetable stew.  Mine is simple and only takes a few minutes to prepare a big pot to enjoy for at least a couple of meals.  This stuff is so delicious that I also can it in quarts for use all winter.
   
Ratatouille
2-4 Tablespoons olive oil
1-2 Medium sweet onion
1-2 Medium eggplant
1-2 Medium red or green bell peppers

Large diced veggies
3-4 Medium green or yellow zucchini
4-6 Cloves of garlic
A handful of fresh basil and oregano

2 teaspoons salt
1-2 Tablespoons sugar
3 14oz cans of diced tomatoes (canned tomatoes are ok to use as they come in the can without draining) or 4-5 cups of fresh garden tomatoes that have been peeled, seeds removed, and excess water drained off.  If using fresh tomatoes, just do them first and let them drain in a 

colander while preparing the rest.
Begin to saute the veggies

Wash and dry the vegetables.  When it comes to the vegetables, there is no exact measurement, this is just a stew.  I say 1-2 Medium, but in general each vegetable ingredient equals about 3 - 5 cups more or less, when chopped. 
 Put the olive oil in a large pot and start with the onions.  Chop the onions and begin to saute them over medium heat.  As soon as they start to soften, turn the burner off and begin to add all of the rest of the vegetables that are chopped into large 1 - 1 1/2 inch pieces.


Mince the fresh herbs and the garlic and add that to the pot as well.  Turn the heat back on to medium and stir and begin to cook the vegetables together.  Add the tomatoes and salt and bring to simmer.  Simmer for 60-90 minutes until the vegetables are cooked through.


Add the chopped and drained tomatoes
Yummmmm!
As the ratatouille is ready, taste it for the appropriate amount of salt and sweetness and adjust to your taste with more salt or sugar.


I serve this over rice or pasta with a sprinkling of Parmesan cheese as a hearty main dinner dish.   Enjoy!

Sunday, August 19, 2012

Got Basil - Got Garlic

Let’s make pesto!  

I've had no less than 3 inquiries about my pesto recipe in the last week, so it sounds like it's time. My basil and garlic are ready to go, so rather than wait another minute, here is my “not so secret” recipe.

Basil and garlic are among those Mediterranean medicinal herbs that are supposed to do great things for your health... and since they are so delicious, why not have them year round!

Traditionally, pesto is made with a mortar and pestle - thus the name pesto.  It is said to have origins in northern Africa, been domesticated in India, and perfected in Genoa, Italy.  Leave it to me to have to come up with my own recipe for the stuff, but I had some modern criteria I wanted my pesto to meet.


I wanted something that I could store and it would stay fresh throughout the long Montana winter.  I did not want to use pine nuts as I have had too many with an off/fishy taste.  A lot of the pestos I had tried were swimming in olive oil, thin and runny.  I thought mine should have less oil and more basil.  Also, with a food processor in my pantry, I was not about to use the mortar and pestle method.

This recipe is simple and only takes a few minutes to make, and you can enjoy it until the basil grows again next year.  (PS - plant more basil next year.)

PESTO
(makes about 4 - 5 cups)

4 cups packed (pack as many leaves as you can into a 4 cup measure), fresh picked, cleaned, and dry basil leaves 
(I use both the Genovese and the larger lettuce leaf varieties, The salad spinner makes quick work of the wash and spin, then I lay them out on a towel to dry, fluffing them a couple of times to assist in the drying process.)
6 large cloves of garlic, peeled
2 cups of walnuts
1 1/2 cups of shredded Parmesan or Romano cheese 
2 teaspoons of salt, or to taste
3/4 cup lemon juice
1 cup olive oil
       
I start with the garlic and the lemon juice in the food processor.  Once the garlic is finely minced, I add the 4 cups of basil leaves and mince those.
Add the salt, walnuts, and cheese and the mixture will be very heavy.
 
With the food processor running, I drizzle the olive oil into the tube and continue to let it work until the whole thing comes together into a beautiful, creamy, light green color.

I then taste to see if it meets my satisfaction.  You can add more salt, more lemon juice, or more oil to your taste and process again until it is well blended and creamy.


Then put the pesto into jars or freezer safe containers that will hold about ½ to 1 cup each.  I use half pints, the tapered jelly jars work fine too.   Put them right into the freezer.  The pesto will retain it’s beautiful, fresh, light green color while frozen.  

Before you plan to use it, move a jar to the refrigerator to thaw.  It will keep for weeks in the refrigerator.  Once opened it will gradually oxidize on the top.  This is normal and doesn't hurt anything.
 
Here are just a couple of suggestions for using your pesto, beyond the linguine that is...

How about spreading it on a loaf of french bread, top with a little mozzarella and broil, or toss it with some new potatoes or green beans, make a green pizza by spreading it on the dough instead of a red sauce - then top with chopped tomatoes and a little mozzarella for a different style Margarita pizza.  I have even known someone that spreads it on a turkey sandwich as a condiment.  Let me know if you discover any great new uses for it, and I will be sharing some additional pesto uses as time goes on.

(Just as I was finishing this post, my husband came in and told me our neighbor was recovering from a fall. I decided to make a casserole for him using the left over pesto and a cabbage I had sitting on the counter - see the next post.)