Sunday, September 30, 2012

Fire Roasted Marinara Sauce

 Fire roasting gives a slight smoky flavor to whatever you roast and so I thought it might be just the perfect way to start my marinara.  This sauce is made from tomatoes, onions, garlic, herbs and a few peppers, freshly plucked from the garden.

Some people call it spaghetti sauce, or Italian tomato sauce, but marinara has a nice ring to my ear.  One theory suggests the sauce was invented by the Spanish in the mid 16th century.  Because of the high acid content of tomatoes, the sauce was resistant to spoilage, making it ideal for lengthy sea voyages and thus sprang the name marinara.  Whatever the name, fire roasting does add an additional element of flavor to the tomato.

Fire Roasting

Two more helpful reasons to fire roast are the removal of additional moisture, and if you want to remove the skins, they can be picked up in your fingers and tossed aside - no need to blanch and skin.

To get started, I took about 10 pounds of San Marzano tomatoes from the garden.  I washed them, cored them, sliced them in half lengthwise and removed the seeds.  I took a couple of onions and sliced them into ½ inch slices, and I cored and sliced lengthwise a couple of peppers.


Fire Roasted Tomatoes

Fire Roasted Marinara

10# fresh Italian paste tomatoes like San Marzano’s
2 large onions
4-6 cloves garlic minced
2-4 green peppers
2-3 Tablespoons fresh minced basil (1 TBS dried)
2 Tablespoons minced oregano (1 TBS dried)
1/2 cup olive oil - divided
3-4 teaspoons salt (or to taste)
1-2 Tbs sugar (optional or to taste)

Fire Roasted Peppers and Onions

Bring your grill to about 350 degrees with medium heat.  Put 1/2 the olive oil in a dish and brush the inside of the tomato with olive oil and place on the grill cut side down.  Quickly fill the grill with tomatoes and close the lid.  The temperature will have dropped to 200 degrees or below.  Wait until the temperature rises to 350 again.  Quickly open the grill and brush the top side of the tomatoes with olive oil and then check the first tomatoes that you put on.  They should have grill marks on them.  Using a spatula, quickly flip them over and close the lid again, waiting for the temperature to get back up over 350 degrees. 

Have a rimmed pan or bowl to put the roasted tomatoes into as juice will continue to run out after you take them off.  Remove the roasted tomatoes from the grill to the rimmed pan and let them cool.  Roast the other vegetables in the same way, brushing them with olive oil and leaving them on the grill to show a little black char marks, but not totally blackened.

Once the tomatoes are cool, you can use your hands to pluck the skins from the tomatoes if you wish, or you can just leave them on as they will be chopped up in the next step.


Add the chopped garlic and herbs to the sauce.

Drain off the liquid from the roasted tomatoes and reserve this liquid. Put the tomatoes into a food processor and pulse to chop finely.  Add the processed tomatoes to a large stock pot with the other 1/2 of the olive oil. Process all of the rest of the ingredients roasted and not and add them to the stock pot.

Thick sauce ready to be cooked


Simmer the sauce for 60-90 minutes stirring frequently. It will be thick and you will need to watch so that it does not burn.  Add the salt, pepper, sugar, and the juice that you reserved from the roasted tomatoes to suit your taste and thickness.


You should end up with about 6 pints (12 cups) of sauce.  You can place that into hot pint jars, seal them and put them in a boiling water bath for 35 minutes or you can cool the sauce and then put it into freezer bags in portions for future use.  Just like the pesto recipe that I gave you last month, there is no end to the uses you will have for this sauce, so make plenty!   

Monday, September 17, 2012

The Glory of the Harvest


 It’s the time of year when we count every night that passes without a frost as a bonus.  Here on the side of the mountain northwest of Missoula, we live in a special little micro-climate that affords us many weeks longer growing season than our neighbors in the valley.  I’m grateful for every growing day I get.

I have a bumper crop of tomatoes that are ripening on the vine.  Soon I’ll be canning marinara, harvest soup, and eating them for breakfast - lunch - and dinner, knowing it will be a long dry spell for fresh tomatoes.  The onions and garlic are already harvested and drying, the potatoes and carrots will be next.

Beautiful Millionaire and Prosperosa Eggplant

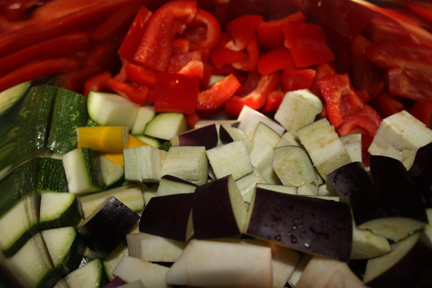
Today I harvested a few eggplant, zucchini, tomatoes and some peppers to make my ratatouille.  Ratatouille is just another word for a vegetable stew.  Mine is simple and only takes a few minutes to prepare a big pot to enjoy for at least a couple of meals.  This stuff is so delicious that I also can it in quarts for use all winter.
   
Ratatouille
2-4 Tablespoons olive oil
1-2 Medium sweet onion
1-2 Medium eggplant
1-2 Medium red or green bell peppers

Large diced veggies
3-4 Medium green or yellow zucchini
4-6 Cloves of garlic
A handful of fresh basil and oregano

2 teaspoons salt
1-2 Tablespoons sugar
3 14oz cans of diced tomatoes (canned tomatoes are ok to use as they come in the can without draining) or 4-5 cups of fresh garden tomatoes that have been peeled, seeds removed, and excess water drained off.  If using fresh tomatoes, just do them first and let them drain in a 

colander while preparing the rest.
Begin to saute the veggies

Wash and dry the vegetables.  When it comes to the vegetables, there is no exact measurement, this is just a stew.  I say 1-2 Medium, but in general each vegetable ingredient equals about 3 - 5 cups more or less, when chopped. 
 Put the olive oil in a large pot and start with the onions.  Chop the onions and begin to saute them over medium heat.  As soon as they start to soften, turn the burner off and begin to add all of the rest of the vegetables that are chopped into large 1 - 1 1/2 inch pieces.


Mince the fresh herbs and the garlic and add that to the pot as well.  Turn the heat back on to medium and stir and begin to cook the vegetables together.  Add the tomatoes and salt and bring to simmer.  Simmer for 60-90 minutes until the vegetables are cooked through.


Add the chopped and drained tomatoes
Yummmmm!
As the ratatouille is ready, taste it for the appropriate amount of salt and sweetness and adjust to your taste with more salt or sugar.


I serve this over rice or pasta with a sprinkling of Parmesan cheese as a hearty main dinner dish.   Enjoy!

Sunday, August 19, 2012

Cabbage Noodle Casserole

Every once in a while, we need to be inventive.  I had some freshly made pesto in my food processor, a cabbage and some sweet onions from the garden on the counter, and the need to make a dish to take to a friend.

That's how this all started and here is what I did.  I invented a Cabbage Noodle Casserole.  This dish makes a great vegetarian main dish or a nice side dish.


CABBAGE NOODLE CASSEROLE
(makes 1 large 8 serving or two 4 serving casseroles)

1  head of green cabbage, chopped
1 large sweet onion, chopped
3 Tablespoons olive oil

In a large skillet, add these first three ingredients and begin to caramelize the onions and cabbage.

As the cabbage and onions turn a nice caramel color, turn off the heat.

In a separate pan, cook just until aldente 4 cups of wide noodles.
Drain the noodles and toss the noodles and cabbage mixtures together.

Add to the mixture 1/2 cup of pesto and 1/2 cup shredded Parmesan cheese.

Toss this all together to mix and place in one large or two smaller casserole dishes.

Top with a hand full of Parmesan cheese and place under the broiler to brown the top.  Instead of the cheese on top, some nice Italian bread crumbs or croutons would work as well.

This is totally cooked and ready to eat as soon as the cheese is melted and the top is browned.


. 

Got Basil - Got Garlic

Let’s make pesto!  

I've had no less than 3 inquiries about my pesto recipe in the last week, so it sounds like it's time. My basil and garlic are ready to go, so rather than wait another minute, here is my “not so secret” recipe.

Basil and garlic are among those Mediterranean medicinal herbs that are supposed to do great things for your health... and since they are so delicious, why not have them year round!

Traditionally, pesto is made with a mortar and pestle - thus the name pesto.  It is said to have origins in northern Africa, been domesticated in India, and perfected in Genoa, Italy.  Leave it to me to have to come up with my own recipe for the stuff, but I had some modern criteria I wanted my pesto to meet.


I wanted something that I could store and it would stay fresh throughout the long Montana winter.  I did not want to use pine nuts as I have had too many with an off/fishy taste.  A lot of the pestos I had tried were swimming in olive oil, thin and runny.  I thought mine should have less oil and more basil.  Also, with a food processor in my pantry, I was not about to use the mortar and pestle method.

This recipe is simple and only takes a few minutes to make, and you can enjoy it until the basil grows again next year.  (PS - plant more basil next year.)

PESTO
(makes about 4 - 5 cups)

4 cups packed (pack as many leaves as you can into a 4 cup measure), fresh picked, cleaned, and dry basil leaves 
(I use both the Genovese and the larger lettuce leaf varieties, The salad spinner makes quick work of the wash and spin, then I lay them out on a towel to dry, fluffing them a couple of times to assist in the drying process.)
6 large cloves of garlic, peeled
2 cups of walnuts
1 1/2 cups of shredded Parmesan or Romano cheese 
2 teaspoons of salt, or to taste
3/4 cup lemon juice
1 cup olive oil
       
I start with the garlic and the lemon juice in the food processor.  Once the garlic is finely minced, I add the 4 cups of basil leaves and mince those.
Add the salt, walnuts, and cheese and the mixture will be very heavy.
 
With the food processor running, I drizzle the olive oil into the tube and continue to let it work until the whole thing comes together into a beautiful, creamy, light green color.

I then taste to see if it meets my satisfaction.  You can add more salt, more lemon juice, or more oil to your taste and process again until it is well blended and creamy.


Then put the pesto into jars or freezer safe containers that will hold about ½ to 1 cup each.  I use half pints, the tapered jelly jars work fine too.   Put them right into the freezer.  The pesto will retain it’s beautiful, fresh, light green color while frozen.  

Before you plan to use it, move a jar to the refrigerator to thaw.  It will keep for weeks in the refrigerator.  Once opened it will gradually oxidize on the top.  This is normal and doesn't hurt anything.
 
Here are just a couple of suggestions for using your pesto, beyond the linguine that is...

How about spreading it on a loaf of french bread, top with a little mozzarella and broil, or toss it with some new potatoes or green beans, make a green pizza by spreading it on the dough instead of a red sauce - then top with chopped tomatoes and a little mozzarella for a different style Margarita pizza.  I have even known someone that spreads it on a turkey sandwich as a condiment.  Let me know if you discover any great new uses for it, and I will be sharing some additional pesto uses as time goes on.

(Just as I was finishing this post, my husband came in and told me our neighbor was recovering from a fall. I decided to make a casserole for him using the left over pesto and a cabbage I had sitting on the counter - see the next post.)

Sunday, August 5, 2012

Whole Sweet Cherry Preserves

A generous person living on the shores of Flathead Lake, allows us to pick cherries each year from her personal orchard.  She has a number of different varieties, but this year she said something that piqued my curiosity.  She said there was one tree that had just plain yellow cherries on it and that no one did anything with those.  That rang a bell in my head and it said, why not?

I checked out the tree and the cherries were just as sweet and delicious as any of the rest, and they were yellow.  I picked about a gallon and a half and thought I would make some whole cherry preserves from them as an experiment.   In the old days, nothing was there without a purpose and nothing went to waste, so I decided to do a little research.

I discovered they were called white cherries, even though they are a beautiful golden color.  They are the major type of cherry used for making maraschino cherries.  The FDA's definition of a maraschino cherry denotes this artificial process: “The term "Maraschino Cherries" is regarded as the common or usual name of an article consisting of cherries which have been dyed red, impregnated with sugar and packed in a sugar sirup flavored with oil of bitter almonds or a similar flavor.”  Not really very appetizing.  No wonder I have never liked maraschino cherries.  

I also discovered that these trees were often planted as a good cross pollinator for the other trees in the orchard.  That makes a lot more sense because there was only one white cherry tree in Nancy’s orchard.

In case you are fortunate enough to have one of these trees in your orchard or run across some of these white cherries at the co-op or farmer’s market, here is a recipe that I’ve formulated to make a big batch of whole white cherry preserves.  You can also use this recipe to make preserves for any type of sweet cherry and you can easily cut the batch in half.

Whole Cherry Preserves
 1.    Wash and drain, and then pit about a gallon and a half of cherries and toss them in about 1/4 cup of lemon juice. This helps keep them from turning brown while you process them.
2.    Heat them slowly and simmer for about 15-20 minutes to release the juice.
3.    Let cool and remove the cherries from the juice.
4.    Bring the juice to a boil and add 10 cups of sugar (or half of this if you are doing a half batch).
5.    After the syrup has boiled for a few minutes, add the cherries back to the juice and bring back to a boil and cook gently for 10-15 minutes.
6.    Turn off the heat and let stand in a cool place overnight (12-18 hours). This allow the air in the cherries to be expelled and helps the fruit to be suspended in the preserves rather than float on top.
7.    Get 12-15 half pint jars ready with lids and the equipment you will be using.
8.    Divide the cherries and juice in approximately half - I did two 7-8 cup batches.
9.    Sweet cherries do not have enough pectin to gel, even in the long boil process so it is necessary to add pectin.  I used one box of Sure-Jell for each of my batches.  I put my cherries and juice into a stock pot and added the pectin, stirring it into the cold juice.
10.    Then I brought it all to a boil that could not be stirred down and boiled it for exactly 1 minute.
11.    Skim and ladle the preserves into hot jars leaving 1/4 inch head space.  Wipe rims, attach lids and place in your boiling water bath.  At our altitude I process in the water bath for 25 minutes.  Check your book or the internet for  the processing time for your altitude.
12.    Remove from the water bath and invert on a towel (lid down) until cool.
13.    Once cool, turn the jars over and the cherries will settle beautifully and evenly from the top to the bottom of the jars.

Enjoy some now and certainly this winter the sunny color will bring a little sunshine to your toast!


Friday, July 20, 2012

Rustic Tart with Flathead Cherries


It's cherry season here in western Montana and that means Flathead Cherries.  For those of you unfamiliar with the term, The Flathead as locals refer to it, is a large valley stretching from just north of Missoula up to the Kalispell-Whitefish area.  Flathead Lake runs up the valley and is the largest natural freshwater lake west of the Mississippi in the lower 48 states, with over 200 square miles of water and 185 miles of shoreline.  The lake moderates the temperatures just perfectly for growing sweet cherries in the fertile foothills around the lake.  
Lapin Cherries


Mostly you’ll find the big dark sweet cherries, Lamberts and Lapins, and many growers also grow the beautiful Rainiers.
Rainier Cherries


Each year we try to go up and pick a lug, or get some from the co-op or local farmer's market.  Those that we don’t devour immediately, get pitted and put into quart freezer bags for later use.  Since the cherries this year are just a few days late, I decided to go ahead and use my last quart from the freezer to make this delicious Rustic Tart.
                   
Some people call this type of pastry a galette, but here in Montana the term Rustic Tart  fits just perfectly.  This can be made with many different types of fruit.  Also try apricots, peaches, or plums.

Start with a rich and flaky crust.  Here is the recipe that I use:

THE CRUST:
1 1/2 cup organic all purpose flour
1 tablespoon sugar
1/2 teaspoon salt
1 stick of unsalted butter
1/4 cup plus more as needed iced water


Either by hand or using a food processor, incorporate the flour, sugar, salt and the butter, just until the mixture looks like a coarse meal.  This is best accomplished with a few quick pulses of the food processor or by cutting in with a pastry cutter.

Fill a 1 cup measuring cup with some ice and some water and allow to stand for a minute or two.  Then I use a 1/4 cup measuring cup to drizzle in 1/4 cup of the ice water (strained, no ice) into the tube while slowly pulsing the processor.  Because we live in such a dry climate, I find that I always need more so as I slowly drizzle more into the processor, I watch for the dough to come together.  You can check it with your fingers to see if it is still crumbly or if it will stick together nicely if you are in doubt.  As soon as the dough comes together, stop adding water and pulsing and turn the dough out onto a floured board.  I fold the dough over 1 or 2 times and form into a flattened disk.  Refrigerate the dough for at least 1 hour.
Dough comes together
Wrap disk in plastic wrap and refrigerate.

THE FILLING:                                       
Now for the fruit... I drain the cherries because they produce a lot of juice when they are frozen. If you are using fresh cherries just wash and pit before measuring.

About 3 cups of fresh or frozen Flathead Cherries (or fruit of your choice)
1/3 cup of organic sugar
a pinch of salt (optional)
1 rounded tablespoon of organic cornstarch

THE TART:
Preheat your oven to 375 degrees.  Beat an egg in a dish with a tablespoon of water. Prepare your pan by covering it with either parchment or aluminum foil. ( I used my pizza pan and I covered it with two layers of aluminum foil.)  Spray the foil lightly with oil.
Roll out your chilled crust into a round about 1/4-1/8 inch thick, and about 15 inches in diameter.  Fold it in half and gently transfer it to the pan, making sure it is centered.  Then open it up again.
Toss the filling ingredients together and dump into the center of the crust.  Spread them out to be about 10 inches in diameter.
Then gently grab the edges of the crust and with a folding motion, take the edges and fold them toward the center, around the crust, making a circle with an open center.
Brush the crust with an egg wash and sprinkle with sanding sugar.

Bake in a 375 degree oven for 1 hour or until beautifully browned and rustic!
Serve with whipped cream or vanilla ice cream for a truly Montana dessert.


Thursday, July 19, 2012

The HOUSE Dressing

I know, it’s been a while since you’ve heard a peep out of me.  What can I say except I’ve been busy - first I took my granddaughter on a train trip from Whitefish, MT to Cincinnati, OH.  That was an adventure!  Then, there has been all the gardening and more gardening, and we are also in the process of finishing up some interior remodeling that is requiring us to remove all of the furniture from most of our house.  UGH!  This is the last big shot on the remodel and so I will be happy when it is all over.
 
And so, with a lettuce bed that looks like this, what's a person to do... except eat salad!

Now, for that recipe you have been waiting for.  With a lot of lettuce ready for the salad plate something  got me reminiscing about a little restaurant that I used to frequent back around 1990 in Olympia, Washington.  It was called the Urban Onion and I don’t know if it’s still there or not, but they had this fabulous house dressing that makes my mouth water just thinking about it.


To make a long story short, after many lunches and salads at this wonderful little place, I finally got up the nerve to ask, “Would you consider giving out the recipe for your salad dressing?”  To my surprise, the wait person returned from the kitchen with a photocopy of a typed version of the recipe.  Apparently I was not the first person to ask, and they generously shared this delicious recipe with everyone. 

On a mission, I dug through my recipe file, which consists of a bunch of pieces of paper of all sizes and shapes, in no particular order, torn from store fliers, newspapers, written on the backs of greeting cards, photo copies, hand written by me and friends, and whole pages ripped from magazines over a period of at least 40 years.  There it was... on that original, slightly tattered, yellowed with age, and splashed with ingredients from previous makings, half sheet of photocopy paper from 1990.  

Elyse’s Potpourri - 
Urban Onion
Recipe - Lemon Tahini Dressing
Ingredients:
2 cups safflower oil
3/4 cup lemon juice
½ cup soy sauce
½ medium onion
1/3 green pepper
2 stalks celery
1 cup tahini
Method:
1.Chop all veggies
2.Mix all ingredients
3.Process until it all comes together

Yield: Approx. 4+ cups
Today I only had olive oil and used a gypsy pepper from the garden.  It was as delicious as I remembered.  If you like Anne's Goddess dressing, you will love this, it's way better without the vinegary taste.

Some how in my mind, 1990 was only about 10 years ago, but 22 years later, here it is!  From Elyse to you... Enjoy!  Thank you Elyse, where ever you are I hope you are well!