Friday, August 15, 2014

Black Currant Coulis and Other Summer Delights

Red Currant Jelly (left) Rhubarb Jelly (right) Rhu-rant Jelly (back)
I've kind of abandoned the blog for the summer.  The Co-op that I wrote it for has changed over people and it doesn't get published anymore so I lost interest.  It's now my recipe file for things I don't want to lose track of or things people ask me about.
I decided to post the recipes that I used to create these jellies and the Black Currant Coulis because I've had a number of people ask me about them.  So, here ya go folks!


Rhubarb Jelly (makes 9-10 half pint jars)

Day 1 pick, wash, and chop into 1 inch pieces about 5-7 pounds of rhubarb.
Place in a large stock pot and add 2 cups water.
Bring to a boil and simmer until the rhubarb is mush.
Allow to cool and then strain through a mesh strainer to remove the pulp.
Store in the refrigerator overnight.

Have a glass of wine.

Day 2 rinse 4 thicknesses of cheesecloth and place in the mesh strainer.  Pour the cold juice through the cheesecloth to remove any residual pulp.

Measure 6 cups of strained juice
2 boxes of Sure Jell
and bring to a full rolling boil over high heat.

Add ½ teaspoon butter and 9 cups of sugar all at once.

Return to a full rolling boil (a boil that can’t be stirred down) and boil for one(1) minute.   

Ladle into hot prepared jars filling to within 1/4 inch of the top.  Wipe threads and rim and seal with two-piece lids. 

Place jars in a boiling water bath that covers the top of the jars for 10 minutes.  Remove to a rack and allow to cool.

Finish the bottle of wine.

Bobbe Almer adapted this recipe from a Kraft Recipes Sure Jell Rhubarb Jelly recipe.


Currant Jelly (makes about 9 half pint jars)

Day 1 pick, and wash about 3 quarts of currants.
Place in a large stock pot and add 2 cups water.
Bring to a boil and simmer until the currants are pale and falling apart.
Allow to cool and then strain through a mesh strainer to remove the pulp.
Store in the refrigerator overnight.

Have a glass of wine.

Day 2 rinse 4 thicknesses of cheesecloth and place in the mesh strainer.  Pour the cold juice through the cheesecloth to remove any residual pulp.

Measure 61/2 cups of strained juice
1 box of Sure Jell
and bring to a full rolling boil over high heat.

Add ½ teaspoon butter and 7 cups of sugar all at once.

Return to a full rolling boil (a boil that can’t be stirred down) and boil for one(1) minute.   

Ladle into hot prepared jars filling to within 1/4 inch of the top.  Wipe threads and rim and seal with two-piece lids. 

Place jars in a boiling water bath that covers the top of the jars for 10 minutes.  Remove to a rack and allow to cool.

Finish the bottle of wine.

Bobbe Almer adapted this recipe from the Sure Jell package.


Black Currant Coulis (makes about 12 half pint jars)


Coulis is a form of thick sauce made from puréed and strained vegetables or fruits.
 
Pick and wash about 4 quarts of black currants.
Place in a large stock pot and add 3 cups water.
Bring to a boil and simmer until the currants are soft and falling apart.
Allow to cool and then put them through a food mill until the remaining seeds/skins are dry

About 8 cups of juice/pulp remain.  Some seeds came through the Foley food mill, but they are fine and taste good so no problem.

Return the juice/pulp to a clean stock pot, add 5 cups of sugar and 2 tablespoons of lemon juice.

I brought this to a boil and let it boil for a few minutes before putting it into hot half pint jars and sealing with two piece lids.

I chose to freeze mine in these jars so I filled them just to the bottom of the threads.  If you prefer, you could fill them on up and process in a water bath.

I’ve already used some of mine by adding a tablespoon to balsamic vinaigrette - it was awesome!  I plan to use some to baste a pork roast and grilled chicken too - yum!  It would be delicious drizzled over cheesecake or an ice cream too.


Bobbe Almer created this recipe.

Thursday, April 17, 2014

Incredible Onion Pie

Have you ever had a fresh, home grown sweet onion that was so sweet and fresh it could have doubled for an apple?  Well last fall I had stopped by a friends house in the valley and as I was leaving, she handed me this huge onion.  I used it in dinner for the next three nights and was sad to see the end of it.  I'd never had an onion so big and so sweet.  

Two things came from this lovely gesture.  One, I've dreamed about making a sweet onion pie since last fall, and two, I just ordered plants of this heirloom onion called Ailsa Craig.  I actually love that name too.  Hum... Ailsa Craig is an island of 219.69 acres in the outer Firth of Clyde, 10 miles from the Scottish mainland, upon-which blue hone granite was quarried to make curling stones. The island is formed from the volcanic plug of an extinct volcano.  Gosh, I had no idea.  What a great name for an onion the size of a small island!

The Ailsa Craigs are gone until the end of summer, but this same friend brought me a few of their storage onions (huge as well) and so I decided to go ahead and make that onion pie today.  

Incredible Onion Pie

3 cups of diced sweet onion
(You may have a little more or less onion and optionally add up to 1 additional cup of other veggies (4 cups total) - I used a sweet red pepper or you could use asparagus, spinach, etc. or nothing at all, just more onion)  Sweet onions will make the sweetest pie, but any good firm onion will make this dish delicious.
1/4 cup olive oil

Dry ingredients:
1 cup flour
1 1/2 tsp baking powder
1 tsp salt
1 tsp sugar
1/2 tsp dried basil

Wet ingredients:
1 cup milk
3 large eggs
1 tablespoon Franks hot sauce or Worchestershire (optional)

Heat oven to 400 degrees and lightly spray or grease your baking dish(es).

This pie is similar to the "Impossible" versions made with a commercial baking mix like Bisquick.  I designed this version to be made from ingredients that most people have on hand, no need to have a special baking product.  The ingredients will form a crust of sorts that will hold the pie together.


Cook the diced onion in a skillet until softened and slightly caramelized and allow to cool.


Place the dry ingredients in a container that is large enough to hold all of the ingredients.  In a separate container, place and blend the wet ingredients together.  When the onion mixture has cooled slightly, mix the wet ingredients into the dry ingredients.  After stirring thoroughly, add the onion mixture and mix together.


Pour the finished mixture into the individual serving dishes or into a greased  9 or10 inch, deep dish pie plate and top with shredded Parmesan cheese.

Place either the individual dishes or pie plate on a pan and place into the 400 degree oven.

Bake for 30-40 minutes until a knife inserted approximately 1 inch from the center comes out clean and the top is a golden brown.


Serve individual dishes or large wedges of the pie along with a green vegetable for an easy and beautiful meal.

Enjoy!


Sunday, February 16, 2014

Caribbean Inspiration

Who wouldn’t like to be sitting on the beach right now with one of those umbrella drinks and a good book?  While I can’t inspire that transition, I can put together a recipe that will use up some of those stored onions and winter squash with a little Caribbean flair.

I’ve always liked the flavors of the Jamaican jerk seasoning, but it is frequently a little too hot for my taste.   I created a seasoning blend that I call Caribbean Spice, which marries some of the flavors of the islands without so much heat.  It is also a combination of spices that most of us have in our pantries, it is easy to make, so let's start here.

Caribbean Spice
1/4 cup brown sugar
2 teaspoons allspice
1/2 teaspoon cinnamon
1/2 teaspoon ginger
1/2 teaspoon paprika

1/2 teaspoon cumin
2 teaspoons salt
1 teaspoon fresh ground black pepper
1/8 teaspoon cayenne pepper or more to taste

Blend the above ingredients together well and store in a dry jar. You'll find many other uses for this seasoning. Use it as a dry rub on pork or chicken before baking or grilling.

Stuffed Winter Squash


1 or 2 small winter squash or 1 larger winter squash (any of the sweet orange fleshed type will work fine, including the little sugar pumpkins)

Prepare the squash by giving them a good wash and then slicing them in two, top to bottom.  Scoop out the seeds and place the squash in a pot with water just to cover and a tablespoon of sugar.  Bring to a boil and simmer for 10 to 15 minutes.  Remove and place cut side down on a paper towel to drain and cool while you prepare the stuffing.


Meat Stuffing:
3/4 pound of ground meat (beef/bison/turkey)
1 tsp olive oil
1 cup diced onions
2 cloves of garlic mashed and finely diced

1/2 cup raisins
1 tsp oregano
4 tsp Caribbean Spice
1 tsp salt
2 tablespoons tomato paste

1 egg beaten
 
Saute the onions and the meat in a little olive oil until the meat is lightly browned and the onions are translucent.  Turn off the heat and add the other ingredients except the beaten egg.  Stir until the ingredients are fully combined and then taste - taste - and taste again.  At this point, you can add a little more heat with pepper flakes or cayenne, more Caribbean Spice or salt to taste.


When you are satisfied with the level of seasoning, and the pan has cooled sufficiently, add the beaten egg and blend thoroughly.


Place the cooled squash cut side up in a baking dish that has been sprayed with non-stick spray.  You can cut off a little piece on the bottom of the squash to help it sit straight if necessary.  

Pile the meat stuffing into the cavity of the squash and on top to completely cover.  The above recipe can be used to make 4 halves of a smaller squash like an acorn or delicata or fill 2 halves of a larger butternut or hubbard type squash.


Cover the dish with aluminum foil and bake at 350 degrees for 1 hour or until an internal temperature of 165 degrees has been reached.

These stuffed squash make a great low carb dinner serving with a small green salad or you can make 4 servings out of the two halves by cutting them and serving with rice.

Enjoy!


Thursday, January 30, 2014

Savory Snowman Soup

Snowbert - Snowberta - Snowthirda
It’s a snowy blustery day here in western Montana, but it’s January 30th and this is the first real snow we’ve had since the first of the year.  It’s a perfect day for Savory Snowman Soup!

Savory Snowman Soup is something I made to peek the curiosity of young and picky eaters.  How could they turn down Snowman Soup?  Unlike the recipes for hot chocolate on the internet that call themselves by the same name, this is a “real” savory soup.

This soup starts with a rich chicken broth. I always make broth from the carcass of my roasted Hutterite chickens because this is another whole meal you would throw away if you don't get this last bit of goodness out of it first.  If you do this too, it’s ok to add the little bits of meat you pick off the bones to the soup. You can also use canned stock or broth or Better than Bouillon vegetarian no-chicken to make the broth if you prefer.

Savory Snowman Soup
Cutting carrot noses.


6 cups Chicken stock or broth
1 medium onion finely chopped
1 teaspoon olive oil
2-3 cloves of garlic mashed and minced
½ teaspoon thyme
2 cups finely diced potato
2 cups carrots peeled and julienne cut

15oz can of black beans rinsed well and drained
4 oz can diced mild green chilies (optional)
1 pint half and half
Salt and pepper to taste

Dice your onion and sweat it in the olive oil for a few minutes until it becomes translucent.  Add the broth and other ingredients, except the beans and half and half, and simmer for 20 minutes or until the potatoes and carrots are tender.  


Snow Bunnies love Snowman Soup
If you would prefer a slightly thicker soup, you can add a few mashed potato flakes or mix a couple tablespoons of organic cornstarch with a little water and stir that into the soup and let it cook for a few minutes to thicken.

Next, add the well rinsed and drained black beans and the half and half.  


Grammie's Snow Bunnies
Taste the soup for seasoning and get ready to serve to curious onlookers.  You can garnish with a little chopped greens if you prefer and a nice accompaniment is soft bread sticks for dipping.

Stay warm and Enjoy!

Thursday, December 26, 2013

Casserole 101

Casserole 101
Sometimes I think the casserole has gone the way of Plum Pudding -- not too many people are cooking them anymore.  A lot of people think "casserole - 1970's - Betty Crocker" but, that's crazy because casseroles are usually easy to put together, flexible, and you can do them ahead so you aren't scrambling around in the kitchen at the last minute.  

The definition of a casserole is "flexibility".  It is a one pan meal cooked in the oven, usually with a brown and crusty top, and may consist of (part 1) rice/grain, potatoes, or noodles, combined with (part 2) vegetables, (part 3) meat or beans, and (part 4) some type of sauce.  Measurements in a casserole may be approximations. For example, you've got 2 cups of cooked rice or 2 1/2 cups, throw it in, as long as the ingredients are somewhat proportional there is no exact science.  I'm going to give you a "flexible" recipe to experiment with.  Let me know how it goes for you and what you did to make it your own.  By the way, if you aren't feeling inventive, it's ok if you just follow what I did because it was delicious!

Casserole 101

Part 1:

For my casserole I used rice.  I was in a bit of a hurry so I used jasmine rice, but I could have used quinoa, or brown rice, or any cooked grain.
I cooked 1 cup of rice in 1 3/4 cup of water and put that as the base in my oil sprayed dish.

Part 2:
We love brussel sprouts and I had picked up a large bag from the co-op for the holidays.  I cleaned and boiled them until they were still bright green, but almost done.  I could have used lightly steamed broccoli, or chopped and sauteed kale, and I could have added sauteed onion to any of these.

Part 3:
OPTIONAL for vegetarians or those who don't want meat, use your favorite protein - be it beans or tofu and it's perfectly ok to skip the meat layer in any casserole.  I had a little left over ham so I diced that up for my meat layer.  It ended up being about a cup of diced ham.  This could have been chicken, beans, ground beef, prosciutto, or none of these.

Part 4:
The sauce.  I chose to make a simple white sauce.  Place 4 tablespoons of butter and 3 tablespoons of flour in a skillet stirring constantly over low heat to make a roux.  
Making the roux.

For a white sauce, you do not want to brown the roux. When it's bubbly as shown in the picture, add 2 cups of milk all at once while stirring until it comes back to a boil and has thickened to a nice consistency.
 Add salt and pepper to taste 1/2-1 teaspoon of salt and a dozen grinds of fresh black pepper.  Herbs make a nice addition to the sauce as well.


Putting it all together.


After you have layered up part 1-2-3, pour your sauce evenly over the dish.


Regarding the sauce, once you have created that, you could add grated Cheddar, Parmesan, or Asiago to the sauce and allow that to melt before pouring.  This would combine well with a pasta layer to make a layered mac and cheese type casserole.


I wanted a lighter flavor for this version, so added a sprinkling of Asiago cheese mixed with a tablespoon of bread crumbs to the top of the casserole for a crusty-cheesy-browned top. 

Everything in the casserole is cooked so the baking time is just to heat it through and bring everything together.  Bake the casserole in a 375 degree oven for 30 - 45 minutes or until the top is browned and bubbly.  If you've made it ahead and had it refrigerated, it might take a little longer to heat through. Allow 60 minutes. Let the casserole cool slightly before serving big squares.


It came out just as tasty as it looks.  Served with a little spinach side salad, it made an impressive and delicious dinner.

I turned leftover ham and brussel sprouts into an entirely new dinner dish.  I could have reheated them and thrown them on a plate with the rice, but this was so much more appetizing and it made that little bit of ham stretch into 4 meals and no one felt slighted.

Here's a couple of ideas for different versions you might want to try for Casserole 101:

Mexican - rice - well drained, diced tomatoes - taco seasoned ground beef and/or black beans - top with a sauce to which has been added a cup of grated cheddar or a Mexican cheese mix - finally top with tortilla chip crumbs.

Broccoli/Cheddar - pasta of your choice, spirals or elbows work well - top with a layer of beans (can be white, red, or black) - lightly steamed broccoli - cheddar cheese sauce, made by adding a cup of grated cheddar cheese to the white sauce - top with bread crumbs.

Quinoa/Kale - quinoa - saute 1 bunch of kale, 1 sweet onion, 2-3 cups chopped green cabbage - optional meat layer of ham or Italian sausage - simple white sauce with 1 tsp dried basil added when it is finished - top with 1/2 cup Parmesan cheese mixed with 1/2 teaspoon Italian herbs and 2 tablespoons of fresh bread crumbs.

Please feel free to share your 4 part combinations to inspire everyone.
Enjoy!


Sunday, October 27, 2013

Sweet Potato Gratin

Sweet Potato Gratin
An idea has been bouncing around in my head for a few weeks and finally I've got it out and prepared. The idea originated with the sweet potato.  I like sweet potatoes and I was giving some thought to something new for the coming Thanksgiving holiday.  I am not a big fan of the yam and even less of a fan of the yam turned candy with marshmallows.  

I wanted something that would be a little more savory but still accent the sweetness of the sweet potato.  I also liked the idea of something I could prep ahead.  Did you know that sweet potatoes and yams are not even remotely related to each other and neither of them is related to the potato. Sweet potatoes are from the same family as morning glories. I like that.

Here's a little sweet potato gratin that I cooked up.  Gratin is just a fancy word for a dish that has a browned crust on top. You can switch the sweet potatoes for yams if that is your preference, but do me a favor try it with sweet potatoes first.

Sweet Potato & Caramelized Onion Gratin
Ingredients:
3-5 medium sweet potatoes (2-3 lbs)
1 cup grated Parmesan cheese
 
2 tablespoons olive oil
3-4 cups chopped onions
3 tablespoons dark brown sugar
pinch to 1/4 teaspoon cayenne pepper

1/4 cup butter
Peel and thinly slice the sweet potatoes

2 1/2 tablespoons flour

2 cups of half and half, light cream, or whole milk
1 1/2 teaspoon salt
1/4 teaspoon dry ground mustard
1/4 teaspoon sweet paprika
1/4 teaspoon nutmeg
 Preheat the oven to 350 degrees and butter or spray an oblong baking dish, 9x13 or similar.

Peel and slice the sweet potatoes very thinly and set aside.  1/8th inch thick is a good thickness. 
Caramelize the onions and add the brown sugar and cayenne

Chop the onion and add them to a skillet with the olive oil.  Begin to sweat the onions slowly.  Once they have lost most of their water, they will begin to caramelize into a nice golden color.  After the onions have caramelized to a light brown, add the dark brown sugar and the cayenne pepper.  Remove from the heat and set aside.


Create the sauce


In another skillet, create a roux with the 1/4 cup butter and the flour.  Add the 2 cups of cream/milk all at once stirring until it is smooth and bubbly.  Turn off the heat and stir in the salt, mustard, paprika, nutmeg, and a few grinds of black pepper.

In your buttered dish, layer half of the sliced potatoes, half the sauce, 1/2 cup of the grated Parmesan and half the onions with their sweet sauce.  Create a second layer with the remaining ingredients, ending with the onions once again.


Cover the dish tightly with aluminum foil.  You can refrigerate it at this point until the next day or until you are ready to bake it.  Bake in a 350 degree oven, covered with the foil for 45 minutes.  At 45 minutes, remove the foil and continue baking for another 15-20 minutes until it is browned and bubbly.


This little dish pairs nicely with turkey, but also with a pork roast or chicken. 

Enjoy!
 

Thursday, October 3, 2013

Fall Spice Cake with Caramel Fudge Icing

Fall Spice Cake with Caramel Fudge Icing


Come late September early October, my mind turns once again to baking.  One of the memories that also returns is of my Dad’s favorite, spice cake.


In an article titled How Smell Works, Sarah Dowdey tells us “smell can bring on a flood of memories, influence people's moods and even affect their work performance.  Because the olfactory bulb is part of the brain's limbic system, an area so closely associated with memory and feeling it's sometimes called the emotional brain.”

While Dad’s favorite was spice cake, my favorite is anything caramel.  Put the two together and “fall” in love with these smells and make your own memories.

Fall Spice Cake


2 1/2 cups cake or all purpose flour
1 1/2 teaspoons baking powder
1 teaspoon baking soda
1 teaspoon nutmeg
1 teaspoon cinnamon
1 teaspoon ginger
1/2 teaspoon allspice
2 sticks (1 cup)unsalted butter
1 3/4 cup sugar
1/2 teaspoon salt
3 fresh eggs
1 cup milk
1 tablespoon lemon juice

Preheat the oven to 350 degrees and butter and flour two 9 inch cake pans or a 9x13 pan.

Cream the softened butter, sugar, and salt together until fluffy. 
Butter-Sugar-Salt-Eggs

Continue to beat in one egg at a time, beating well after each egg.
Measure all of the dry ingredients into one bowl and mix them together.
Measure the milk and lemon juice into a separate container.
Alternately, beat the dry and the wet ingredients into the butter, sugar, and eggs, beginning and ending with dry ingredients as follows: 1/3 dry - 1/2 wet - 1/3 dry - 1/2 wet - 1/3 dry.
The batter will be light and fluffy.  Spoon it evenly into the cake pans and spread it out.

Bake for approximately 25-30 minutes until a toothpick inserted into the center comes out clean.  You may bake this as a 9x13 or in cupcakes or even mini muffins but vary the times accordingly.

Once baked, turn the cake(s) out to cool on a rack.


Caramel Fudge Icing
1 stick (1/2 cup) unsalted butter
1 cup dark brown sugar
1/4 teaspoon of salt
1/4 cup milk or cream
1 teaspoon vanilla extract
3-4 cups of confectioner’s sugar

Melt the butter with the brown sugar in a saucepan.  Bring it to a boil and cook it over medium heat for 2 minutes, stirring constantly.  Remove the pan from the heat and add 3 cups of confectioner’s sugar.  Beating with a spoon or a mixer until smooth, add the vanilla and the additional cup of confectioner’s sugar.  The mixture should be thick but still pour-able.  If it gets too thick, warm it again gently and add a touch of milk.


While the mixture is thick but pour-able, pour a puddle on the first cake layer.  Spread it quickly with a knife and put the second layer on top.  Quickly pour the rest of the icing around the cake making ribbon like motions or just let it drip down the sides and empty the remaining icing into the center of the top of the cake.  It is important to work quickly with this icing because it is like fudge.  It will set up quickly.

UMmm. UMmm. Memories, light the corners of my mind, Misty watercolor memories of the way things were...  Remembering you Dad!


Also just in case you see it and are curious.  The plate does say something... it has a drawing of a turkey, a tipi, and a little Indian and it says "Two Bobbe - Ray, 1976"  That's when my son was 6 and he made the plate for me in school - yes, more memories...

Enjoy!

Friday, August 23, 2013

Garden Freestyle

Today's bounty
Wandering through the garden each morning with an eye toward what will be for dinner is one of the great pleasures in life.  Gardens often offer up bountiful surprises in some years and disappointment in others.  Zucchini seems to be one of those bountiful crops and so I ponder new ways to use this beautiful vegetable.

I love soup and it's something we sometimes don't think about as a summer meal, but this one will surprise you with it's light, savory, fresh from the garden flavor.

Garden Freestyle - Soup
 This recipe makes a good sized pot of soup and the variations are endless.

Start with:
Saute the onions in olive oil until translucent


3 quarts of chicken stock (you can use Better Than Bouillon Chicken or Veggie for the stock if you wish) 
2 cups onion chopped
2 tablespoons olive oil
4 cloves of garlic minced
8-10 slices of bacon cooked, drained, chopped
2 cups half and half or heavy cream


From the garden - co-op - farmer's market:
4 - 5 cups chopped zucchini (1" pieces) or cauliflower or cabbage or a combination
4 cups chopped kale or chard or spinach or a combination
1/2 - 1 cup of chopped fresh herbs - usually basil and thyme, sometimes a little oregano or sage. If you don't have fresh herbs, use about a teaspoon each of dried basil and thyme.
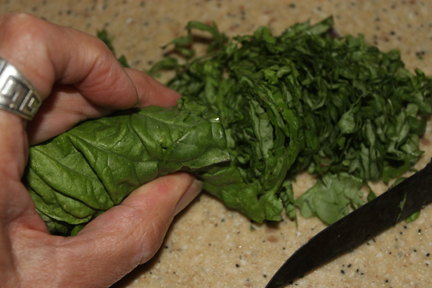
I wash, stack, and roll the kale and basil leaves and slice them.

If you have a few potatoes, a little corn or peas, let your intuition and garden dictate what you will make today.  I've tried a number of different combinations, but my favorite is still just the zucchini and kale which are always abundant.  The amounts are just guidelines.  If you chop up 5 zucchini and get 6 cups, use it, it's no problem with this Freestyle soup.


Step 1 - cook the bacon and set it aside to cool, drain, and chop
In the pot ready to simmer.

Step 2 - saute the onions in the olive oil until they become mostly translucent
Step 3 - add the garlic, chopped veggies, and the stock
Step 4 - add the bacon (additional meat is optional - in this photo you see a little chicken that I picked from the bones when I made my stock from a chicken carcass. 
Step 5 - add the herbs and simmer until the veggies are tender, about 15-20 minutes depending on the veggies you
are using.
Step 6 - stir in the half and half or heavy cream and season with salt and pepper to taste. 

Serve this Garden Freestyle soup for lunch or dinner with a crusty bread if desired. 

If you have left overs, they get even better the next day as the smoky flavor increases.  This is an amazingly delicious light summer soup, made with the freshest ingredients your garden or farmer's market can offer!

Enjoy!


Saturday, July 6, 2013

I'll Never Boil Another Egg

Recently a friend of mine told me about a different way to make hard cooked eggs.  I was skeptical to say the least. She said, "you have to try this!"  

I'd given up years ago on ever having hard boiled eggs that were easy to peel, not to mention having to cook 24 eggs to get 12 decent ones to make a batch of old fashioned deviled eggs.  I'd tried all the various tips like aging the eggs, baking, vinegar, flash cooling... etc.  None of them  were easy to peel and some of them resulted in eggs that were gross and ugly.

Well I'm here to tell you I'm a convert.  I will never boil another egg.  The way to get perfect hard cooked eggs that are easy to peel is to steam them.  I know, what's the difference?  I couldn't imagine that there could be any difference between boiling and steaming, but it's true - there is.  I've done this a few times myself with different eggs and even eggs that I grabbed right out from under the chicken.  It made no difference, they were all equally easy to peel and they were perfectly cooked. 

EASY TO PEEL HARD COOKED EGGS:

Washed eggs in steamer basket
Place fresh, sound, and washed eggs in a steamer basket.

Heat a couple of inches of water to a boil in a pot with a steaming lid or a lid that will hold in the steam.  The steaming lid just has a little hole in it that will let out a stream of steam as it is boiling.

When the water begins to boil, set the steaming basket in the pot and cover with the lid.  Set the timer for 20 minutes.

Eggs steaming with the lid on tight

Just before the timer goes off, fill a bowl with ice and water.  At 20 minutes plunge the steamed eggs into the ice water to stop the cooking and cool them down to touch.  


Eggs cooling in iced water


Once the eggs are cool enough to handle, peel them.  I timed my peeling of 12 eggs today at just over 6 minutes.... wow, is that a record or what?   Not one of them was marred in the process.


I  almost always do a dozen at a time because then I can refrigerate them and have them for a quick breakfast or lunch.  It doesn't really matter if you do 1 or 12, the directions are the same.  You will find the process so enjoyable that you just might want to pull out your grandmother's recipe for deviled eggs.  Well, if you don't have a recipe for Deviled Eggs, here is one that my grandmother used to make.

DEVILED EGGS


6 hard cooked eggs cut in half lengthwise
Separate the yolks into a bowl and reserve the whites for filling
Mash up the yolks with a fork and add:
3 tablespoons of mayonnaise
1/2 teaspoon dry mustard
1 teaspoon cider vinegar
1-2 teaspoons sugar
2 tablespoons of sweet pickle relish (optional)

Combine the yolk mixture with a fork until well mixed.  Taste and add salt and pepper as needed.  Spoon into the egg white bases and garnish with a dusting of dill weed or paprika.

Refrigerate immediately and allow the flavors to mingle before serving,

Enjoy!


Tuesday, May 28, 2013

The Mighty Rhu

Rhu Barbarum - Rhubarb
Rhubarb, a gift from the barbarians beyond the Vogue River (Rha River).  
Get it?... Rha Barbarum.  Initially, only the root was used and uses date back to 2700 BC where it was grown and used in China for medicinal purposes.  It is thought to have made its way to America in the late 1700’s.  

Today, a look around any old farmhouse or homestead will locate the perennial rhubarb plant that brought vitamin C and other vitamins, and a fresh new season of food to families each spring.

Rhubarb grows in stalks from underground rhizomes.  It multiplies readily and it is easy to share a portion of your plant with a friend.  That’s where I got mine and I have since shared forward to several others. What a great plant!

Many people think of rhubarb as only a spring plant, however, if you pick and use the rhubarb regularly throughout the growing season, it will continue to produce into the fall.  Be sure to quickly cut off any bloom stalk that appears too.  The stalks are the edible part.  The leaves contain oxalate, which is toxic even in small quantities and should not be consumed.  Nutritionally speaking, rhubarb is a great addition to the table.  Detailed nutritional data can be found at http://nutritiondata.self.com/facts/fruits-and-fruit-juices/2056/2

Rhubarb is thought of as a fruit, but it is actually a vegetable.  It can be used in both sweet and savory dishes.  So far I’ve only used it in sweet dishes but I plan to experiment in the coming season with a savory use for this healthy vegetable.  In this post, I’ll share several of my favorite rhubarb recipes:

Rhubarb Crisp

1 1/2 pounds of rhubarb make about 4 cups diced

A top favorite with my family, this is a simple and delicious rhubarb crisp.  Even people who say no thank you to rhubarb pie will ask for seconds.

4 cups of rhubarb stalks cut lengthwise and then into ½ inch pieces (about a pound and a half)


Sauce:
1 cup water
1 cup sugar
3 tablespoons cornstarch
1 teaspoon vanilla
 

Combine the crust ingredients
Crust:
1 cup flour
1 cup packed brown sugar
1 cup rolled oats
1/4 teaspoon salt
1 stick butter, melted

Pour the sauce over the rhubarb
1.  Preheat the oven to 350 degrees
2.  Cut the rhubarb
3.  Combine the sauce ingredients in a small pan and bring to a boil - turn off and set aside.
4.  Combine the crust ingredients in a medium bowl and mix with a fork until blended


5.  Place half the crust mixture in the bottom of an 8x8 or 9x9 pan or similar.
6.  Spread the rhubarb evenly over the crust.
7.  Pour the sauce over the rhubarb and finish with the rest of the crust mixture

Rhubarb Crisp!


Bake for 1 hour and serve warm with vanilla ice cream or at room temperature with some whipped cream.

Next up is a recipe that I’ve only recently adapted from The Slow Mediterranean Kitchen.
 

This is quite a bit more work, but produces a very tasty tart.


Rhubarb Custard Tart

Rhubarb Custard Tart
Ingredients:
Pie crust
1 ½ pounds of rhubarb diced (4 cups)
1 cup sugar - divided
1-2 tablespoons orange liqueur and or 1 ½ teaspoons of finely grated orange zest
3 large eggs
3/4 cup heavy cream
pinch of salt

The day before, or 5-6 hours before, prepare a flaky pie crust from your favorite recipe and chill.  Wash and dice about 1 ½ pounds of rhubarb into ½ inch pieces (4 cups).  Toss with ½ cup of sugar and refrigerate over night or for 4-5 hours.


Drain the sugary juice from the rhubarb

The next day, drain the rhubarb in a colander set over a skillet.  Allow it to drain while you prepare the crust.

Preheat the oven to 375 degrees.  Roll out the crust and place in your pan.  Put the pan into the freezer for a few minutes until you are ready to put it into the oven.  Prick the bottom and weight it down with pie weights or dried beans on top of aluminum foil.  Bake the crust on the bottom rack of the oven for 10-12 minutes.  Remove the foil and weights and bake another 5-7 minutes until it is just golden.  Let it cool to room temperature.


Boil the juice to reduce to a very thick syrup
While the crust is cooling, boil the rhubarb juice in the skillet until it is thick and syrupy and reduced to just a few tablespoons.  Remove from the heat, stir in the rhubarb and the orange liqueur/orange zest and allow it all to cool to room temperature.

Set the oven temperature to 400 degrees.  In a medium bowl, whisk together the eggs, cream, remaining ½ cup of sugar, and pinch of salt.  


Distribute the rhubarb mixture evenly over the bottom of the tart shell and pour half the custard over and let it settle, then pour the rest of the custard.

Ready for the oven
Bake the tart until the custard is puffed and golden brown, about 30-35 minutes.  Allow to cool completely before serving.  Serve at room temperature with a dollop of vanilla whipped cream.


Now you must be ready for my final rhubarb discover!  

Last year I harvested over 72 pounds of rhubarb from my 4 plants.  What in the world was I going to do with all that rhubarb?  I mostly put it in my pot and made rhubarb juice.  I used the juice to make my granddaughter’s now favorite jelly.  It makes a delicious, delicate pink jelly.  I'm not planning to post that recipe here but if you need it, send me a message.

I wanted to make something else with my juice, so I made rhubarb tea and rhubarb lemonade.

Hummingbird Cocktails

Hummingbird tea (left) Hummingbird lemonade (right)

Rhubarb Juice - we also call this Hummingbird Juice (not to be given to hummingbirds)

Wash, trim, and chop up rhubarb stalks into 1 inch pieces. 
Put into a pot and just cover with water. 
Simmer the rhubarb until it breaks down into a mush.  This doesn’t take long, maybe 10-15 minutes.


Rhubarb ready to simmer
Allow it to cool to a working temperature or room temperature.
Strain the juice through a colander over a large bowl or clean pot.  Allow time for it to drain completely, do not press or force the rhubarb through the colander.
Strain the juice one more time through a fine mesh strainer.  (If you are going to use the juice to make jelly, I strain it through a cheese cloth draped over the strainer for crystal clear jelly.)


Strained rhubarb juice

Once you have your strained rhubarb juice, to make the “hummingbird juice” I add about 1/4 cup of sugar per full cup of juice.  I don’t bother with partial cups as this is plenty sweet.  Make sure the sugar dissolves completely.  You might need to warm the juice a little to get the sugar dissolved.  Then refrigerate the juice.

To make my Hummingbird Cocktails, I add crushed ice to a glass, add about 1/4-1/2 rhubarb juice and top that off with green tea or lemonade.  Give it a little stir and serve with or without a garnish.  


I’ve never been a vodka drinker, but someone left a partial bottle here sometime ago.
  This sis knot soooo badd wit ah tittle splosh a vodka tooo.

Enjoy!